
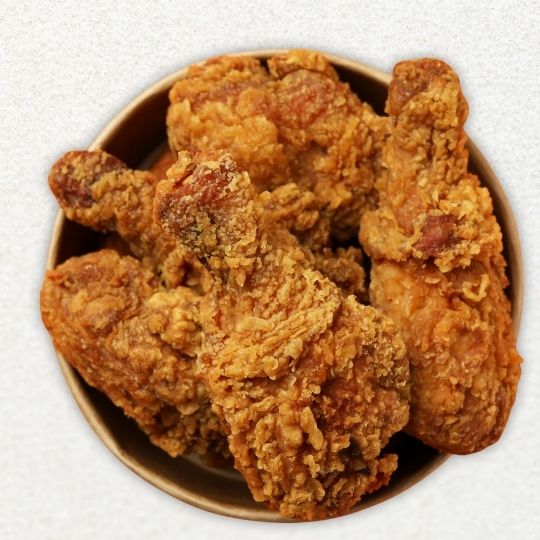
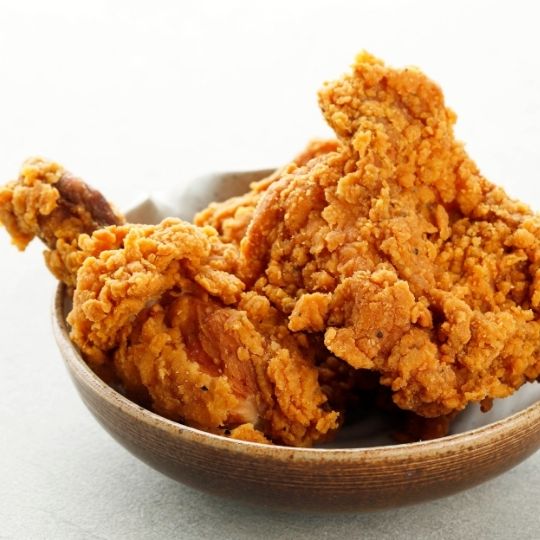
Honestly, I don’t think I’ve ever met someone who doesn’t get excited about crispy fried chicken. Whether I’m cooking for game day with the crew, throwing together a quick weeknight dinner, or planning a proper weekend feast, fried chicken always becomes the main event.
And here’s the thing—it plays so well with everything. Mac and cheese? Perfect. Baked potatoes? Amazing. Buffalo chicken dip for game day? Great appetizer, but this fried chicken feeds the whole crowd. Cornbread, coleslaw, mashed potatoes with gravy, or even just a simple green salad—it all balances out that crispy goodness perfectly.
I’ve been obsessing over this KFC-style recipe for years now, tweaking it until I got it just right. My friends literally won’t let me host a gathering without making this chicken anymore, and now everyone’s constantly asking for the recipe because their kids have gone absolutely crazy for it.
Trust me, once you nail this technique, you’ll understand why it’s become my most requested dish.
So here’s the recipe that’s been taking over my kitchen—let’s get started.
KFC Copycat Fried Chicken Recipe (Wings or other pieces)
15
minutes2 – 12
hours15 – 30
minutes45 – 60
minutesThis recipe aims for that savory, slightly spicy, and incredibly crispy coating.
Ingredients
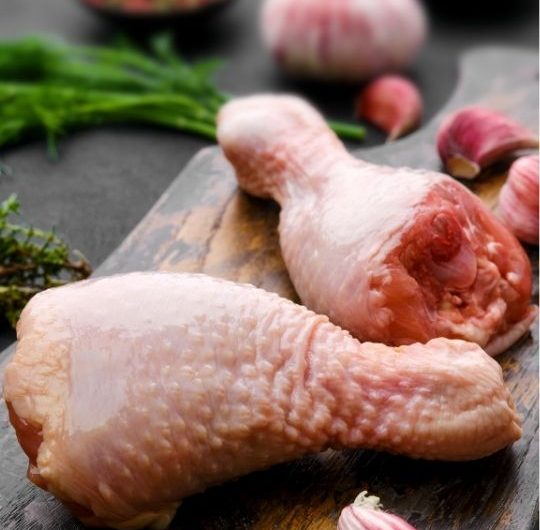
2 lbs chicken wings (or mixed pieces like drumsticks, thighs, breasts), patted very dry
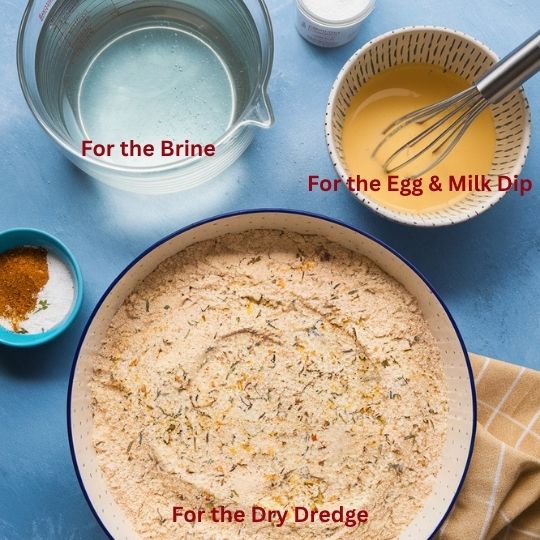
- For the Brine (Optional, but recommended for flavor & juiciness):
4 cups cold water
2 tbsp salt
1 tbsp sugar
- For the Egg & Milk Dip:
2 large eggs
1 cup buttermilk (or milk with 1 tbsp vinegar/lemon juice)
1 tbsp hot sauce (like Tabasco, optional, adds flavor depth, not just heat)
- For the Dry Dredge (The “11 Herbs & Spices” Approximation):
2 cups all-purpose flour
1/2 cup cornstarch (for extra crispiness)
1/2 teaspoon baking soda (Crucial for that bubbly, extra-crispy crust!)
2 ½ tbsp salt
1 ½ tbsp ground black pepper
1 tbsp paprika
1 tbsp onion powder
1 tbsp garlic powder
1 tsp dried oregano
1 tsp dried thyme
1 tsp ground ginger
1/2 tsp dried basil
1/2 tsp celery salt
1/2 tsp white pepper
1/2 tsp cayenne pepper (adjust to your spice preference)
Vegetable oil, peanut oil, or canola oil for deep frying (enough to submerge chicken)
- Equipment:
Large pot or Dutch oven for frying
Meat thermometer or candy thermometer (crucial for oil temperature)
Wire rack set over a baking sheet
Directions
- Brine the Chicken (Optional but Recommended):
- In a large bowl, whisk together the water, salt, and sugar until dissolved.
- Add the chicken pieces, ensuring they are fully submerged. Cover and refrigerate for at least 2-4 hours, or up to 12 hours. This step adds moisture and flavor.
- After brining, drain the chicken well and pat very dry with paper towels.
- Prepare Wet Dip:
- In a shallow bowl, whisk together the eggs, buttermilk, and hot sauce (if using) until well combined.
- Prepare Dry Dredge (The Secret Blend):
- In a large, shallow dish, large bowl, or a large resealable plastic bag, combine all the dry dredge ingredients (flour, cornstarch, baking soda and all the spices).
Whisk or shake vigorously to ensure every spice is evenly distributed. This is key to mimicking the KFC flavor. - Dredge the Chicken (The KFC Coating Technique):
- Working with one piece of chicken at a time, fully submerge it in the egg/buttermilk mixture, letting excess drip off.
- Transfer the wet chicken piece to the dry dredge. This is important for the KFC texture: Use your hands to really press the flour mixture onto every surface of the chicken.
Don’t just toss it; press it firmly, making sure every crevice is coated and a thick, shaggy layer forms. Shake off any loose excess. - Place the coated chicken on a wire rack set over a baking sheet. Repeat with all chicken pieces.
- Rest the Chicken: Let the coated chicken rest on the wire rack at room temperature for at least 15-20 minutes (or even up to 30 minutes in the fridge). This allows the coating to hydrate and adhere properly, preventing it from falling off during frying and creating a crispier crust.
- Heat the Oil:
- Pour enough oil into your large pot or Dutch oven to reach about 3-4 inches deep (enough to mostly submerge the chicken).
- Heat the oil over medium-high heat to 325°F (160°C). KFC uses pressure fryers, which cook at a lower temperature but faster due to pressure. For home deep frying, starting a bit lower helps cook the chicken through without burning the crust.
- Fry the Chicken:
- Carefully lower 2-3 pieces of chicken into the hot oil. Do not overcrowd the pot, as this will drastically drop the oil temperature and result in soggy chicken.
- Maintain the oil temperature as close to 325-330°F (160-165°C) as possible throughout frying. Adjust heat as needed.
- Fry the chicken for about 12-18 minutes for larger pieces (thighs/drumsticks) or 6-10 minutes for wings, flipping occasionally, until deep golden brown and cooked through.
An instant-read thermometer inserted into the thickest part (avoiding bone) should read 165°F (74°C). - If the crust is browning too quickly, you can slightly reduce the heat. If it’s too pale, slightly increase it.
- Drain and Serve:
- Once cooked, carefully remove the chicken from the oil and place it on a clean wire rack set over a baking sheet (do not place directly on paper towels as it can steam and get soggy). This allows excess oil to drip off and keeps the crust crisp.
- Let the chicken rest for a few minutes before serving.
Secret Tips for Insanely Crispy Fried Chicken 🍗
I’ve spent years perfecting my technique, and I’m excited to share the game-changing tips that’ll take your chicken from good to absolutely mind-blowing crispy.
These are the secrets that make all the difference!
1. Pat That Chicken Like Your Life Depends On It
I go a little crazy with the paper towels here, pressing firmly and really getting every bit of surface moisture off. Sometimes I’ll even set the chicken on a wire rack in my fridge for an hour or two to air-dry.
Here’s why this matters: any water on the surface turns to steam during frying, creating a barrier between the oil and coating. This steam makes the crust soggy instead of crispy.
Dry chicken = direct oil contact = maximum crunch.
2. My Cornstarch (and Rice Flour) Game-Changer
The cornstarch in our recipe is already doing amazing work, but here’s my pro tip: try swapping some of it for finely ground rice flour.
Cornstarch and rice flour both contain less gluten than wheat flour, which means they fry up lighter and crispier.
Rice flour especially creates an incredibly delicate, glass-like texture because its fine particles form a more uniform, delicate crust when fried.
3. The Baking Soda Miracle
This little addition is my secret weapon! The baking soda reacts with the acidic buttermilk and the heat to create tiny CO2 bubbles throughout the coating. These bubbles expand during frying, creating air pockets that make the crust lighter and more textured.
Just don’t go overboard – too much creates an unpleasant metallic taste.
4. Patience, My Friend – Let It Rest
I give my coated chicken 15-30 minutes to just sit there on a wire rack.
During this time, the buttermilk’s moisture penetrates the flour mixture, creating a paste-like “glue” that bonds everything together. This prevents the coating from sliding off during frying and ensures the layers stay intact while crisping up.
5. Temperature Control is Everything
I’m religious about my thermometer – 325-330°F is my sweet spot for that perfect KFC-style cook. At this temperature, the chicken cooks through evenly while the coating has time to develop that deep golden color.
Too hot and the outside burns before the inside cooks; too cool and the chicken absorbs excess oil instead of crisping up. Never crowd your pot because adding cold chicken drops the oil temperature, leading to greasy, soggy results.
6. My Ultimate Secret: The Double Fry
For wings especially, this technique is incredible. I fry them once at a lower temp (300-325°F) until cooked through, let them rest, then hit them with a quick high-heat fry (375°F) right before serving.
The first fry cooks the chicken and sets the coating structure.
The second fry at higher heat rapidly dehydrates the outer surface, creating an incredibly crispy shell while the interior stays juicy. It’s like having the best of both worlds!
These techniques work because they all focus on controlling moisture and maximizing surface texture – the two key factors in achieving that perfect crispy coating. Now get out there and happy frying! Your kitchen is about to smell absolutely incredible.


Leave a Reply